Product Information

Do you need to service your bikes starter motor?

Do you need to service your bikes starter motor?

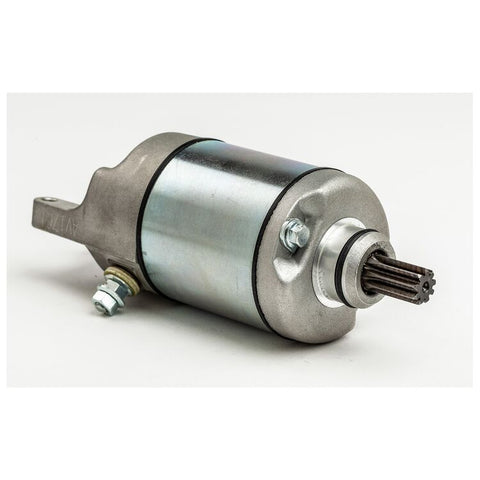
The starter motor in your motorcycle is a strong electric device that must turn the engine over and start the combustion process before it can continue on its own. To crank the engine, you'll need an electric motor that can deliver a lot of torque in a short period of time, on demand, and over and over. That is exactly what the starting motor is, plus a system that allows it to mechanically engage and disengage in a moment.

Starter Motor

But, how does the starting motor function? When you turn the key, electricity is transmitted to the ignition system, which fires the spark plugs, and to a bigger magnetic switch, which delivers a surge of power directly from the battery to the starter.

The solenoid is a magnetic switch that is often fastened to the starter itself, switching high amperage power and causes the gears to mesh. When the electromagnet is activated, the solenoid plunger links the thick battery wire to windings within the starter to spin the electric motor, as well as pushing a rod, engaging a fork, which in turn pushes a pinion gear (attached to the motor) to engage with the flywheel automatically.

The starter requires the most power of any component on your automobile, which is why the first sign of a depleted battery is difficulty starting. If you turn the key and just hear "click, click, click, click," it's likely that the battery lacks enough power to crank the starter, but the solenoid is working.


A starter motor might fail in a variety of ways, but it seldom happens all at once. If the starter's internal mechanical parts (for example, the bearings) begin to fail, it will require more force to turn it until it no longer turns quickly enough to start the engine. If the insulation on the armature winding begins to deteriorate, the starter will lose torque and may refuse to turn the engine over, even with a fully charged battery. If the starting just clicks but does not turn and the battery is fully charged, the contacts within the solenoid or commutator are likely old or unclean and not carrying electricity as well as they should.  Sometimes a starter will work fine in the morning, but not crank once it has gotten warm from driving.


What are the signs that i need to change my starter motor


If the starter motor appears to be dead, you must first rule out the battery as a possible source of the problem. Are the other electrical components operating properly (headlights, inside lights, electronic windows) or is the battery dead? Are the battery terminals rusted or in excellent condition? Examine the starting motor solenoid terminal as well. If required, clean them. Check the fuse(s) and measure the voltage at the starting solenoid control terminal with the ignition key in the 'start' position. If voltage is present, there is most likely a problem with the starting motor.


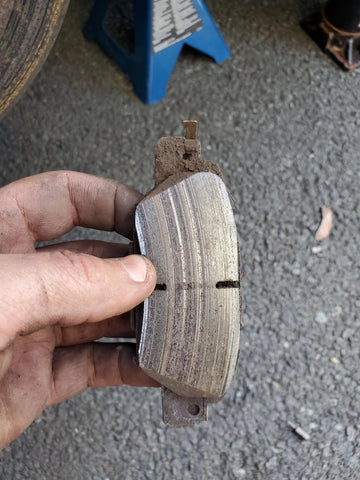
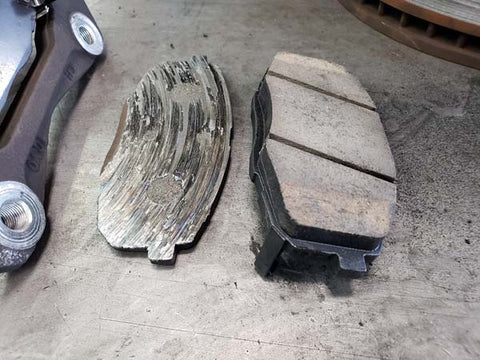
The brushes on the starting motor are the most prone to wear. The minimum length is not specified, however anything more than 5 mm should be adequate (dependent on the starter motor). Check to see whether the brushes are cracked, chipped, or otherwise damaged. Check that each brush is properly attached to its wire, and that the wire is securely attached to its termination. Check the springs in the brush housings for wear.


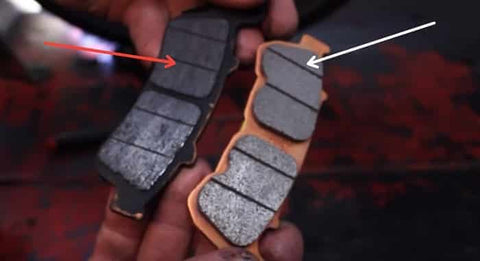
Look for scoring, scratches, and discolouration on the commutator bars. Crocus cloth can be used to clean and polish the bars; do not use sandpaper or emery paper. Wipe away any residue with a towel soaked in an electrical system cleanser or denatured alcohol after cleaning. Check that the insulating material (mica) between each of the bars is below the bars themselves and carefully scrape any away if required.


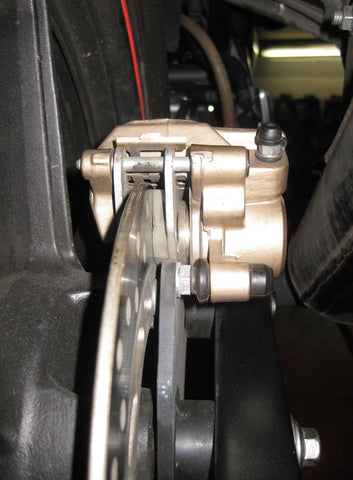
Using an ohmmeter or a continuity test light, check for continuity between the commutator bars  . Continuity should exist between each bar and all of the others. Also, check for continuity between the commutator bars and the armature shaft   (see illustration)  . There should be no continuity (infinite resistance) between the commutator and the shaft. If the checks indicate otherwise, the armature is defective.  

The why & how to rebuild the brake master cylinder and brake caiper

The why & how to rebuild the brake master cylinder and brake caiper

It's always good when your bike stops when you squeeze the brakes. Fortunately, a motorcycle brake calliper repair is one of the most economical insurance plans for good brake maintenance. Bikes are just not designed to survive rain or road salt, and many riders are unaware that one or more of their calliper pistons have seized - until it's too late.
A brake rebuild is completely disassembling and inspecting/cleaning your brakes before rebuilding them with new seals, whilst a refurbishment entails stripping the castings to bare metal, recoating, and oven drying before reassembly - to ensure they appear flawless.
So how do you rebuild a caliper?
cliper
It is critical to keep your calipers clean, but you should also clean and lubricate the pistons on a regular basis. To do so, just unbolt the caliper and slide it off the disc, rather than pushing the pads back into the caliper. After that, you may remove the pads and clean the pistons. Check to see whether the pads are in excellent shape and have plenty of life remaining in them.
Using brake cleaner, clean all of the exposed piston and up to the seal, then apply a smear of red rubber grease to the same area. Don’t slather it on as you don’t want it getting on the pad face.
Make sure the pads are returned in the same place as they were taken out, otherwise they will have to bed to the disc again. Then replace any springs and the holding pin / clip (after cleaning them too).
When do you know it's time for this rebuild?
brake components
If you take care of the calipers, you should simply rebuild them at the required service intervals - in this example, every two years! If you're looking to buy a bike, you may inspect the calipers by lifting the wheel off the ground and twisting it, feeling and listening for drag. Apply the brakes, then let go to see whether the wheel frees up; if they don't come off cleanly, you'll most likely need to put in some effort.
And what parts do I need?
If your calipers have been well maintained, a rebuild should just require a seal kit.  If you're looking for a kit MotoUsher sells one and this could include the following;
repair kit
  • Wiper seals
  • Dust seals
  • Caliper joint seals
  • Stainless steel bleed nipples
  • Bleed nipple covers
  • Copper banjo washers
  • Red rubber grease
The brake pistons might be corroded, in which case they’ll need to be carefully cleaned with wire wool, but if they’re too badly damaged, they should be replaced. 
repair kit
The steps 
Step 1: Drain the fluid and loosen the caliper joining bolts
Step 2: Remove the pistons
Step 3: Remove the seals
Step 4: Clean gunk out
Step 5: Clean the fluid pathways
Step 6: Clean the seal seats
Step 7: Clean the caliper body faces
Step 8: Thoroughly flush the calipers
Step 9: Fit the new seals and pistons
Step 10: Fit the two sides back together
Step 11: Fit the pads
Step 12: Put the calipers back on the bike
Rebuilding a brake master cylinder
Both the front and rear master cylinders are practically the same - a piston that pumps brake fluid down the lines to the caliper, driving the pistons out to force the brake pads on the disc. The manufacturer will have matched the size of the piston in the cylinder to the calipers depending on the desired sensation.
How to take care of your brake master cylinder
The most essential thing is to change the brake fluid every two years to help avoid internal corrosion. Aside from that, there is usually nothing that has to be done to maintain a brake master cylinder other than keeping the reservoir lid closed and the exterior clean. It is critical that you use the prescribed fluid listed in your bike's owner's handbook. Check the label on the reservoir cap as well. Other than that, keep the brake lever’s pivot pin greased to avoid it getting corroded.
There's little reason why the master cylinder shouldn't survive the lifespan of the bike unless it's damaged in some manner - the calipers are more likely to need repair much before the front or rear master cylinders.
So how do I know when to rebuild the master cylinder?
If you pull the brake lever (or push down on it in the case of the rear) and it feels graunchy, the lever pivot pin is most likely rusted; it should be replaced, but if it's not substantially damaged, you may clean it up and oil it.
Another explanation for a harsh sensation to the lever (or pedal) is that the braking fluid has absorbed water and must be replaced.
If the brakes won't hold pressure, causing the lever to pull back to the bar (or the pedal to drop to the bottom) - however slowly - the seals in the master cylinder may be worn or broken.
How to rebuild a brake master cylinder?
Step 1: Remove the master cylinder
Step 2: Remove the rubber boot
Step 3: Remove the circlip
Step 4: Take out the piston and spring
Step 5: Check and clean the cylinder
Step 6: Fit the new seals to the new piston
Step 7: Fit the new spring
Step 8: Insert the spring and piston assembly
Step 9: Fit a new circlip
Step 10: Fit the boot
Step 11: Fit the cylinder back onto the bike
Step 12: Fill with new fluid and bleed the system
How to store your motorcycle long term?

How to store your motorcycle long term?

Correctly protecting and storing your motorcycles is one of the biggest challenges facing anyone. How you store your vehicle can all depend on the time of year, and the age and value of your bike. If it’s a classic, you may want to go to extra lengths to ensure its safety. Let’s take a look at how best to store your motorcycle.

Read more →

Mental Health & Motorcycling, what’s the correlation?

Mental Health & Motorcycling, what’s the correlation?

Any motorcyclist out there would love to be on the saddle, gunning through the twisties & grinning ear to ear under the helmet, rather than sitting in front of the P.C & excelling the sheets. What makes us choose the former over the latter & is it a boost to one’s inner peace?

Read more →

Are you risking permanent hearing loss by not wearing earplugs while riding a motorcycle

Are you risking permanent hearing loss by not wearing earplugs while riding a motorcycle

Many motorcycle riders protect themselves while riding by donning helmets, boots, and gloves, but ear protection is frequently forgotten. Earplugs should be your top priority every time you ride your bike outside because wind noise has the potential to harm your hearing. The best motorbike earplugs are affordable and protect your ears from damage. Many riders choose not to use earplugs, despite the fact that doing so puts them at risk for irreversible hearing loss.

No noise ear plug


Wind Noise 


Another potential threat to the motorcyclists' hearing is wind noise. Without hearing protection, one hour of motorway driving can result in irreversible hearing loss.


A motorbike ride at 60 kph with an open helmet and no hearing protection leads to ambient noise levels of 75 to 90 dB, which are equal to using a leaf blower or lawn mower.


Even though your helmet protects you from shocks and even collisions, it does not do much to block out sounds. According to studies, wearing a helmet can reduce noise by a maximum of 3 to 5 . A cheap pair of earplugs can cut your exposure to noise by up to 35 DB, allowing you to ride all day without worrying about your hearing. The values at 100 kph  range from 103 dB to 116 DB. A drive without hearing protection should be limited to no more than 15 minutes at those highway speeds.


Benefits of good quality earplugs


It can cost anywhere from a few dollars to many more for earplugs. We'll start with inexpensive polyurethane foam because it works well and is simple to utilize. Roll 'em up, put 'em in your ear, and you're good to go. The majority of designs prevent debris from being embedded in the earplugs, extending their longevity. When getting basic foam earplugs, you'll also get more than one set, so make sure to keep a few on hand in various places. You can find items with thermoplastic elastomer (TPE), zirconium oxide ceramic filters, and other more advanced designs when you pay more. It's crucial to understand that these are not one-use plugs that invariably end up being misplaced.

no noise ear plug chart


You can still hear sounds around you thanks to precision filters, which particularly address wind noise. This includes Bluetooth speakers built into your lid, car horns, and other vocal cues. The pressure regulation elements on them operate the same whether you use them while riding or on an airplane. While still being able to hear other crucial sounds that increase riding safety, you will be able to filter wind and engine noise up to 24 dB Additionally, products from reputable manufacturers will be available in two sizes to ensure proper fit and will work with intercoms so you can still have a modernised ride.


What do we recommend?


The competition is edged out with the NoNoise Motorsport Noise Filter Ear Protection. While blocking dangerous noises, these earplugs' ceramic filtration technology still allows you to hear lower-frequency stimuli like conversations, sirens, and horns. These earplugs are ideal for persons who commute in areas where it's against the law to wear headphones that cancel out horns and sirens. These earplugs provide some of the best noise-cancelling capabilities among earplugs with filters, reducing noise by up to 29.6 dB.

ear plug in ear

These are more environmentally friendly than disposable models because they are made of washable, silicone-free thermoplastic (TPE). The zirconium-oxide ceramic filter is intended to eliminate the obstruction-like sensation. The thermoplastic outer design of these earplugs may make them less secure than traditional foam ones, which is one of the product's few drawbacks. These earplugs appear expensive at first appearance, but their relatively high price is justified given that they are well manufactured and reusable. The purchase price includes a carrying case.


In the end ..


A noise level above 85 decibels can cause permanent hearing damage. Under your helmet it will quickly reach 105 decibels, which is not only dangerous at the time itself but also in the long term. That is why some motorcyclists already wear plastic or foam earplugs. The disadvantage of these is that they block all sound and are therefore dangerous.

no noise ear plug


Earplugs for motorcycles help you by attenuating only the disturbing sounds, they should allow you to drive safely, get less tired and enjoy a relaxed ride. 

The why and how of Engine Valve Clearance checks for your motorcycle

The why and how of Engine Valve Clearance checks for your motorcycle

All engines must have at least two valves per cylinder, one for the intake of a fuel-air mixture and one for the exhaustion of air and any unburned fuel following the combustion stroke. Your engine's seal while the valve is closed is also crucial.

Read more →

Is your coolant leaking, what to look for?

Is your coolant leaking, what to look for?

There is probably a leak, either from the radiator or someplace else, if the coolant hasn't recently been replaced. Since motorcycle coolant is confined within a sealed system, checking the coolant level when the engine is cold should reveal no changes provided the system is in excellent condition. Water expands when it's heated, thus the level will rise while the engine is warm, but it will drop back to the "cold" level when.

Read more →

We list the nine most unplanned expensive bike repairs.

We list the nine most unplanned expensive bike repairs.

Costs for various makes and models will obviously vary, but this provides a good indication of the common mechanical issues that will put the greatest hole in your budget and how much of the cost is made up of labor vs components, which is essential knowledge for frugal home mechanics.

Read more →

What it takes to keep a Triumph Tiger with 50K on the ODO and how to keep a maintenance log for your bike.

What it takes to keep a Triumph Tiger with 50K on the ODO and how to keep a maintenance log for your bike.

Service History and bills included in this blog

Generally logging on maintenance comes into picture from the Day one of possession of your bike, well to me it started back in 03rd July 2017, I bought home my “Mjolnir” Matt Aluminum silver Tiger 800 XRx (CBU). It’s been 5 years now, I have spent quality time riding this bike and maintaining it too. My journey with the Triumph Tiger was hassle free and memorable and I am still enjoying every bit of it. This bike is capable of taking you miles around the globe with the added advantage of loading accessories and luggage systems.

Tiger 800

Maintenance schedule or keeping a log on your desired maintenance interval is more important to keep the bike healthy and running, I strongly believe that, “part of the journey is to maintain and keep a log of it”. All these years I have spent time in finding readily  available and the right grade oil, I have used the stock oil filter and air filter since the time of purchase and that is a pretty easy job to start with. As we all know, Triumph has a  maintenance interval of 10,000 kms or 1 year, well non-intentionally I have clocked 10,000 kms every year and promptly done the service. The first three services were completed at a Triumph authorized service center, Valve clearance check was done at 20,000 kms and necessary gaskets have been changed in that service.

Post warranty, I started exploring or I would say learning to get the service done by myself at my friend’s garage. As we all know, since the time of launch of this product by Triumph, it was the most sold bike.  Well that made it easy to procure necessary spares and complete the service on our own with expected level of perfection. I have done last three services at my friend’s garage with expert guidance. This opportunity gave me exposure to what tech or mechanical component I ride with.

In the blog of mine I have attached a detailed excel sheet that is the bikes maintenance log book, this includes what are the spares I  have changed, accessories added, where the service done and cost of the service too (approximately).

Motorcycle maintenance log Motorcycle maintenance log

 Tiger 800

Why it is important to keep it updated? 

It’s just not enough we fill fuel, gear up and ride to different locations, it’s equally important to check and change the spares which are due for replacement. It’s always good to be cautious with what we love to do. I would hate that I have to be stranded in the middle of a ride with a leaking fuel pipe or coolant hose, damaged clutch cable, bad bearing or a worn out sprocket. It is completely necessary to inspect these things and keep a log of it. Most importantly never service your bike before a day of your ride, sometimes things might take sideways and you will need more time to fix it. So here's how I do it, I complete the service, take it for a short ride, analyze and inspect the changed spares are working well, then plan for the long road trip which will be worriless ride. Having such a long journey with my bike means there are things that I need to keep a track of so going forward i know if that is the part that needs change or if I have already changed it how long has it lasted and it gives me an idea what could have gone wrong. A maintenance log book helps me with such information. Lot of people forget when their last oil change has been done, there are many components in a bike that needs to be checked and/or replaced. This log becomes my bible in such a case. 

How is the bike running now?

Whatever it takes, I spend time to maintain my ride, and I consider it as the most important task. I have changed few mechanical components in my last 50k service and all its done is make the bike feel brand new. Now I shall kick start my second half of the journey reaching towards 100000 kms on this tiger 800 XRx. Keeping the bike in check, be it battery, be it mechanical components or electrical components, it never left me shamefully in middle of the road. Touchwood things are good and I am enjoying the ride.

Motorcycle Brake Pad Replacement, We show you how.

Motorcycle Brake Pad Replacement, We show you how.

We have covered a lot on what brake pads are and how to choose them. In this blog we will take you through a quick intro on brake pads and show you how to check for brake pad wear and finally write out a detail step by step instruction on how you can change them at home with the right tools

Brake Pads in a nutshell

Brake pad

Brake pads are steel base plates with pucks of high friction material adhered or riveted to them. Hydraulic pistons that are mounted in the brake calipers push these brake pads against the brake discs. This happens when your foot pushes the brake lever that builds pressure through the master cylinder that leads to braking in a vehicle.

Brake Pads wear check

‘To determine how worn they are, glance at the edge of the pad inside the calliper.’

brake pad Brake pads new & old

When your motorcycle is serviced, it's crucial to check your brake pads and replace them as necessary to ensure safe operation. The only surefire method to be certain is to visually check the brake pads directly. When changing the brake pads, be sure to always examine the rest of the braking system. If the discs or rotors are thin, grooved, or deformed, have them replaced.

Another way of telling how worn the pads are is to examine the level of fluid in the brake fluid reservoir (which drops as the pad wears).

1  Each brake pad has one or more wear indicators that can be viewed without removing the pads from the caliper. 

2  On the brake pads when the friction material has worn to the bottom of the grooves (i.e. the grooves are only just or no longer visible), the pads must be replaced with new ones. 

brake pads

4  If you can't see the wear indicators then you should be able to see the amount of friction material remaining. If the pads are dirty, or you are in doubt as to the amount of friction material remaining, remove them, clean them using brake system cleaner, and measure the amount of friction material remaining – the minimum specified by most Manufactures is 1.5 mm. (check your service manual)

5  Always renew brake pads in pairs, and renew the pads in both front brake calipers at the same time. 

Brake Pads

Brake Pads replacement

1  Release the brake hose  from the mudguard and from the clip holding the ABS sensor wire where fitted, to give more freedom of movement. 

                    Brake PadsBrake PadsBrake Pads

2  Unscrew the pad retaining pin plug and slacken the pin. Unscrew the caliper mounting bolts and slide the caliper off the disc. Unscrew the pad retaining pin and remove the pads 

4  Inspect the surface of each pad for contamination and check that the friction material has not worn beyond its service limit. If either pad is worn down to or beyond the service limit wear indicator or the minimum thickness specified, is fouled with oil or grease, or is heavily scored or damaged by dirt and debris, both pads in each caliper must be replaced with new ones.

5  If the pads are in good condition and not worn to the limit, clean them carefully, using a fine wire brush that is completely free of oil and grease, to remove all traces of road dirt and corrosion. Using a pointed instrument, clean out the grooves in the friction material and dig out any embedded particles of foreign matter. Spray with a dedicated brake cleaner to remove any dust. 

6  Check the condition of the brake disc

7  Remove all traces of corrosion from the pad pin. Check for signs of damage and wear. 

8  Separate the bracket from the caliper by sliding them apart . Clean off all traces of corrosion and hardened grease from the slider pins and rubber boots. Check the rubber boots. If they are damaged, deformed or deteriorated, they should be replaced with new ones.

9  Clean around the exposed section of each piston to remove any dirt or debris that could cause the seals to be damaged. If new pads are being fitted, now push the pistons all the way back into the caliper to create room for them; if the old pads are still serviceable push the pistons in a little way.

10  If a piston appears seized, apply the brake lever and check whether the piston in question moves at all. If it moves out but can’t be pushed back in the chances are there is some hidden corrosion stopping it. If it doesn’t move at all, or to fully clean and inspect the pistons, disassemble the caliper and overhaul it

11  If removed, fit the pad spring into the caliper, making sure it is clean and correctly located   . Make sure the guide is clean and correctly fitted on the bracket  . Apply a smear of silicone based grease to the slider pins and inside the boots  

12  Lightly smear the pad retaining pin with copper grease. Fit the pads into the caliper. Fit the pad pin clips . Slide the caliper onto the disc, making sure the pads sit squarely on each side. Fit the caliper mounting bolts and tighten them to the torque setting specified.

14  Operate the brake lever until the pads contact the disc. 

15  Check the fluid level in the reservoir

16  Check the operation of the brake before riding the motorcycle. 

Brake PadsBrake Pads


Why do you need to replace brake pads?

Your motorcycle's brake pads are essential for its safe operation, therefore you should keep them serviced to prevent a potential catastrophe. The stopping distances will be much greater and may result in an accident if the pads wear all the way to the backing plate.


The pads' friction material wears down over time since it is a little softer than that of the steel discs. Every time you stop, a minuscule quantity of material is removed from a starting thickness of more than 1/4 inch. Prior to the backing plate touching the discs, you must change them; otherwise, you will soon need to replace the discs as well.