


We have covered a lot on what brake pads are and how to choose them. In this blog we will take you through a quick intro on brake pads and show you how to check for brake pad wear and finally write out a detail step by step instruction on how you can change them at home with the right tools
Brake Pads in a nutshell

Brake pads are steel base plates with pucks of high friction material adhered or riveted to them. Hydraulic pistons that are mounted in the brake calipers push these brake pads against the brake discs. This happens when your foot pushes the brake lever that builds pressure through the master cylinder that leads to braking in a vehicle.
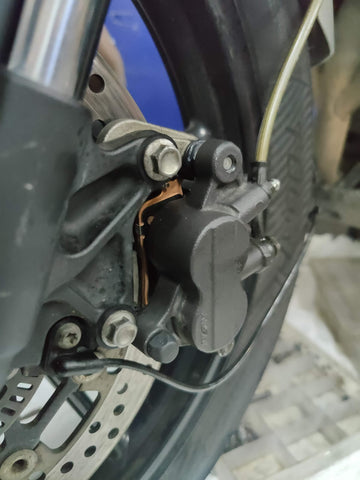
Brake Pads wear check
‘To determine how worn they are, glance at the edge of the pad inside the calliper.’
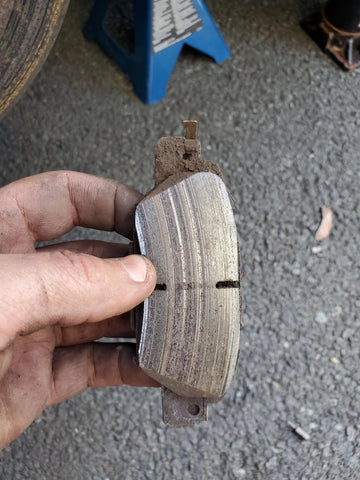
When your motorcycle is serviced, it's crucial to check your brake pads and replace them as necessary to ensure safe operation. The only surefire method to be certain is to visually check the brake pads directly. When changing the brake pads, be sure to always examine the rest of the braking system. If the discs or rotors are thin, grooved, or deformed, have them replaced.
Another way of telling how worn the pads are is to examine the level of fluid in the brake fluid reservoir (which drops as the pad wears).
1 Each brake pad has one or more wear indicators that can be viewed without removing the pads from the caliper.
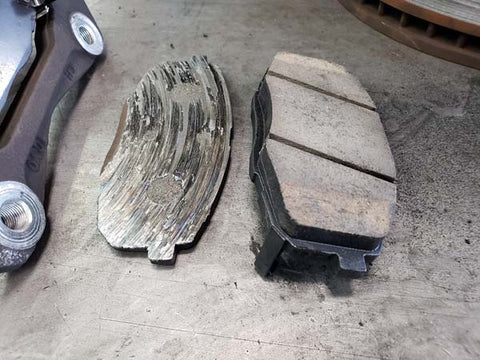
2 On the brake pads when the friction material has worn to the bottom of the grooves (i.e. the grooves are only just or no longer visible), the pads must be replaced with new ones.
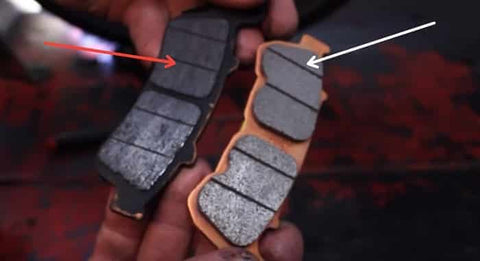
4 If you can't see the wear indicators then you should be able to see the amount of friction material remaining. If the pads are dirty, or you are in doubt as to the amount of friction material remaining, remove them, clean them using brake system cleaner, and measure the amount of friction material remaining – the minimum specified by most Manufactures is 1.5 mm. (check your service manual)
5 Always renew brake pads in pairs, and renew the pads in both front brake calipers at the same time.
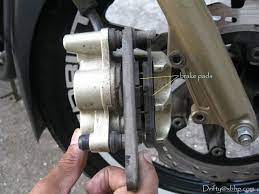
Brake Pads replacement
1 Release the brake hose from the mudguard and from the clip holding the ABS sensor wire where fitted, to give more freedom of movement.
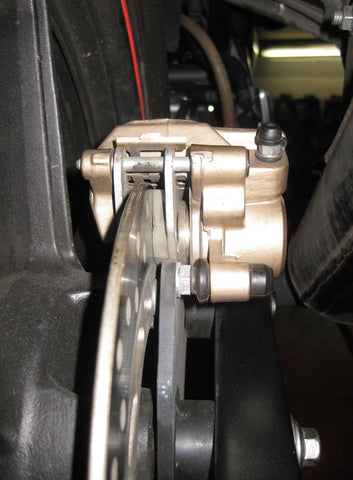

2 Unscrew the pad retaining pin plug and slacken the pin. Unscrew the caliper mounting bolts and slide the caliper off the disc. Unscrew the pad retaining pin and remove the pads
4 Inspect the surface of each pad for contamination and check that the friction material has not worn beyond its service limit. If either pad is worn down to or beyond the service limit wear indicator or the minimum thickness specified, is fouled with oil or grease, or is heavily scored or damaged by dirt and debris, both pads in each caliper must be replaced with new ones.
5 If the pads are in good condition and not worn to the limit, clean them carefully, using a fine wire brush that is completely free of oil and grease, to remove all traces of road dirt and corrosion. Using a pointed instrument, clean out the grooves in the friction material and dig out any embedded particles of foreign matter. Spray with a dedicated brake cleaner to remove any dust.
6 Check the condition of the brake disc
7 Remove all traces of corrosion from the pad pin. Check for signs of damage and wear.
8 Separate the bracket from the caliper by sliding them apart . Clean off all traces of corrosion and hardened grease from the slider pins and rubber boots. Check the rubber boots. If they are damaged, deformed or deteriorated, they should be replaced with new ones.
9 Clean around the exposed section of each piston to remove any dirt or debris that could cause the seals to be damaged. If new pads are being fitted, now push the pistons all the way back into the caliper to create room for them; if the old pads are still serviceable push the pistons in a little way.
10 If a piston appears seized, apply the brake lever and check whether the piston in question moves at all. If it moves out but can’t be pushed back in the chances are there is some hidden corrosion stopping it. If it doesn’t move at all, or to fully clean and inspect the pistons, disassemble the caliper and overhaul it
11 If removed, fit the pad spring into the caliper, making sure it is clean and correctly located . Make sure the guide is clean and correctly fitted on the bracket . Apply a smear of silicone based grease to the slider pins and inside the boots
12 Lightly smear the pad retaining pin with copper grease. Fit the pads into the caliper. Fit the pad pin clips . Slide the caliper onto the disc, making sure the pads sit squarely on each side. Fit the caliper mounting bolts and tighten them to the torque setting specified.
14 Operate the brake lever until the pads contact the disc.
15 Check the fluid level in the reservoir
16 Check the operation of the brake before riding the motorcycle.
Why do you need to replace brake pads?
Your motorcycle's brake pads are essential for its safe operation, therefore you should keep them serviced to prevent a potential catastrophe. The stopping distances will be much greater and may result in an accident if the pads wear all the way to the backing plate.
The pads' friction material wears down over time since it is a little softer than that of the steel discs. Every time you stop, a minuscule quantity of material is removed from a starting thickness of more than 1/4 inch. Prior to the backing plate touching the discs, you must change them; otherwise, you will soon need to replace the discs as well.
Comments